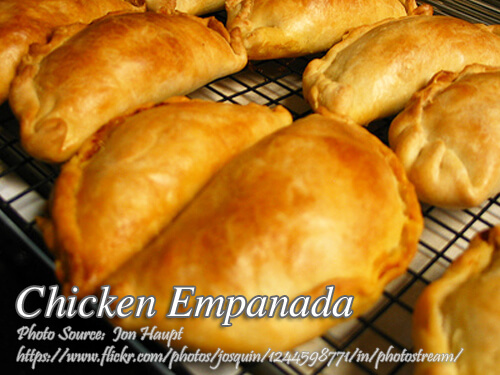
This is I think the most popular kind of empanada, the chicken empanada. Either you can bake this empanada or fry it if you don’t mind having a lot of grease in your meal. Baking is preferred not only it is healthy because it is grease less, it is also more flaky when you bake it. Those are some advantages of baking pastries rather than frying.
Chicken Empanada: A Taste of Home
There’s something about the aroma of freshly baked pastry that instantly takes me back to my childhood. When I make these savory little hand pies, I’m reminded of my lola’s bustling kitchen, where she seemed to always have a new batch ready whenever I visited. While empanadas come in many flavors, this version, stuffed with a flavorful chicken filling, has always been my favorite. It’s a dish that’s comforting, nostalgic, and brings people together, whether around a family table or shared with friends.
This dish can either be baked for a healthier and flakier version, or fried for that indulgent, crispy finish. While I prefer the baked route, both methods carry their own charm, depending on how you want to experience this classic treat.
A Family Tradition in Every Bite
Whenever I prepare these golden pastries, I follow the recipe that’s been passed down from my grandmother. She was an amazing cook, and watching her make this from scratch was like witnessing magic. I remember how she’d expertly blend the butter into the flour, making sure everything was just right, while humming a tune. Back then, she would fry these little pies because it was how they did it in the province. But as time went by, we learned that baking them was just as delicious, and even healthier.
What I love most about these empanadas is the flaky, buttery crust. Baking instead of frying makes a huge difference here—without the excess grease, the dough becomes light and crisp, almost like a puff pastry. Each bite gives you that satisfying crunch, followed by the soft, savory filling.
The Art of the Perfect Filling
Making the filling for this dish is straightforward but requires a little bit of love, just like lola used to say. You start by sautéing onions in a hot pan until they’re translucent and fragrant. Then, in go the other ingredients—chicken, vegetables, and a touch of seasoning, letting them simmer together until everything is perfectly tender. Finally, the secret ingredient that gives the filling its creaminess: milk. Adding milk right at the end and allowing it to cook for a few minutes gives the filling a richness that pairs so well with the flaky crust.
I always let the filling cool down before stuffing it into the dough. This was one of those tips my tita shared with me when I first started making this on my own. Hot filling can make the dough soggy, and we want to keep that crust as crisp as possible!
Crafting the Perfect Dough
While the filling is essential, the dough is the heart of any good empanada. Lola’s recipe calls for a simple mixture of flour, sugar, salt, and butter. Using cold butter is key here, and I still remember her showing me how to cut the butter into the flour with two knives—such a simple technique, but it made all the difference. Today, I sometimes use a food processor to save time, but there’s something meditative about doing it by hand, just like she did.
Once the dough resembles coarse cornmeal, you sprinkle just enough water to bring it all together. Then, you form it into a ball and knead it gently. I always remember Lola’s advice not to overwork the dough—too much kneading would make it tough instead of light and flaky. Rolling out the dough to about a quarter-inch thick, I then use a saucer as a guide to cut out perfectly sized rounds. It’s a trick I picked up from my auntie when she didn’t have a dough cutter at hand.
Folding and Baking: A Moment of Anticipation
Filling the dough is always a fun part. You spoon in a couple of tablespoons of that rich chicken filling, fold the dough over, and press the edges to form that signature half-moon shape. I like to crimp the edges with a fork for that classic look, and then, for the finishing touch, I brush the tops with either milk or egg yolk to get that lovely golden brown color during baking.
Baking these little pies fills the house with an irresistible smell. As they bake, the crust puffs up and turns golden, and when you finally take them out of the oven, there’s a sense of accomplishment—and anticipation. Waiting for them to cool down just enough to take the first bite is probably the hardest part of the process!
The History Behind the Pastry
Did you know that empanadas have a long history, dating back to Spain? The name comes from the Spanish word “empanar,” which means to wrap or coat in bread. When the Spanish colonized the Philippines, they brought this tradition with them, and over time, it became a beloved part of Filipino cuisine. In different regions of the Philippines, you’ll find various versions of this dish, each with unique fillings and techniques. For instance, in Ilocos, you might find empanadas with a much heartier, almost crunchy crust, often stuffed with longganisa and egg.
Though traditionally a snack, in many Filipino households, empanadas are now enjoyed any time of day, whether as a hearty merienda or a light dinner. They’re perfect for celebrations, bringing back memories of family gatherings and special occasions.
A Dish to Share with Loved Ones
One of the things I love most about making this dish is sharing it with the people I care about. Whether it’s a rainy afternoon with family or bringing a batch to a friend’s house, these little pies are always a hit. There’s something about the combination of the buttery crust and the savory filling that makes you feel at home, no matter where you are. Just like lola used to say, food isn’t just about eating—it’s about the memories and the people you share it with.
So the next time you’re in the mood for something comforting and delicious, try baking a batch of these pastries. You’ll find yourself transported to a time and place filled with warmth, laughter, and maybe even a story or two of your own.
How to Make Chicken Empanada
Ingredients
Filling for Empanada:
- 2 cups cooked flaked chicken meat
- 1 onion chopped
- 2 cups diced potatoes cooked
- 1 green bell pepper finely chopped
- 2 tsp. curry powder optional
- 1/4 cup evaporated milk
- 1/2 tsp. powdered pepper
- salt to taste
Ingredients for the crust:
- 2 cups all-purpose flour no need to sift
- 1 tsp. fine salt
- 6 Tbsp. water
- 2/3 cup butter or margarine chilled
- 2 Tbsp. white sugar
Instructions
How to cook the filling for chicken empanada:
- Saute onion, add all ingredients except milk. cook for 5 minutes, add milk and cook for another 3 minutes. Cool. Then use this filling to fill in dough.
How to make the chicken empanada:
- Mix sugar, salt and flour. Cut in butter using a blender or 2 knives until it resembles coarse cornmeal.
- Sprinkle water and mix well with hand to form a ball. Knead lightly.
- Sprinkle flour on a board and roll out dough into 1/4" thick.
- Cut using a round cutter (a medium sized saucer can be used if there is no molder. Place saucer up-side down on dough and cut with a knife).
- Then, fill each cut dough with 2 Tbsp. of sauteed fillings. Fold dough to form a half moon, press one end to the other.
- Brush with egg yolk or milk. Arranged on a greased baking sheet.
- Bake in a preheated oven about 350°F until the crust is golden brown.
Notes
Cooking Tips:
Perfect the Dough Consistency
To achieve a flaky, tender crust, make sure your empanada dough is cold before rolling it out. Cold butter or shortening helps create pockets of steam that result in a light, crispy texture. If the dough becomes too warm or sticky, chill it in the fridge for 10-15 minutes before continuing.Season the Chicken Filling Generously
For rich flavor, season your chicken with a mix of spices like cumin, paprika, garlic, and onion powder. Sauté the chicken with onions, peppers, and garlic to build depth in the filling. Adjust the seasoning to taste after cooking, as under-seasoned filling can make empanadas bland.Seal the Empanadas Securely
To avoid leaks during baking or frying, ensure the edges of the empanadas are sealed tightly. Use a fork to crimp the edges or fold them into a decorative pattern, which adds both style and security. If necessary, lightly brush the edges with beaten egg before sealing to enhance the bond.

Best recipe ever. I fried it my family love it.
Hi V, I’m happy that your family loved it!
Hi! Can I fry this instead of baking in the oven? Will the result still be the same? 🙂
Hi Juvy, I think frying will not make the crust flaky compared to baking.
simple recipe and easy to learn.but pls indicate estimate number of servings of one recipe.
Hi Josefina, please see the recipe again it says 5 servings.
very helpful for learning