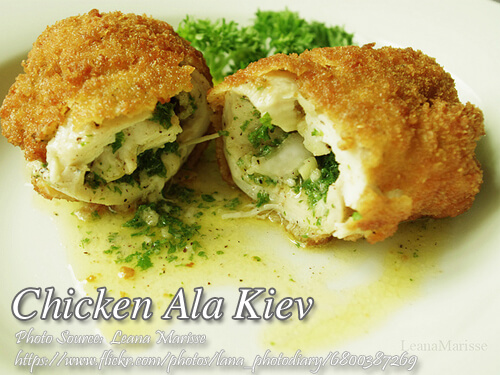
Chicken ala kiev is a Russian chicken dish that is very popular. This is an easy to make chicken dish made by pounding the chicken breast fillet until it becomes a sheet then stuffed with cold butter in the center by wrapping the butter with the flattened chicken breast into a roll that resembles a drumstick. Then coated with beaten egg and breadcrumbs. This way the butter will melt inside the chicken when you fry it and when you slice it, the butter will ooze from the chicken. This is a very interesting dish that you have to try.
Chicken Ala Kiev: The Family Favorite with the Secret Butter Surprise Inside
There is magic in every dish that’s been passed down from generation to generation. And for me, this rich and flavorful chicken ala kiev dish actually really takes me right back to my childhood kitchen where I first learned the proper steps to cooking with my grandmother. This dish was commonly known as chicken ala kiev. It was famous for its buttery filling oozing at the edges, and golden crust crunching beautifully as soon as the knife touches it. For my family, though, it is not just a pretty dish but comfort food in every possible sense of the word. It became a treat on weekends when we would have a simple yet delicious meal to enjoy.
A Family Twist of its Own
While the origins of this dish derive from Russian cuisine, most families, including my own, have made this recipe their own. My grandma, the ultimate cooking expert, enjoyed substituting butter with quick-melt cheese when she was feeling adventurous. She would say that the butter version could almost be called elegant, while the cheese version could only be used for such functions as family reunions. Regardless of the type of filling, I would never miss the way the fried chicken was cut into, and the oozing out of the filling was a great delight.
One of the most excellent memories of this dish is when my uncle, who would love to venture into his kitchen to experiment with different dishes, gave me the idea of putting minced garlic to the butter. He believed that would give the chicken that additional punch of flavor. I then thought it sounded weird, but I tried it. All I knew was that I was hooked on this stuff. The garlic butter was giving it a depth that just made the dish no-brainer. I ended up cooking it every time I cooked myself, and I always remember the quirky, creative way he cooked for me.
The Trick that Makes the Difference for Chicken Ala Kiev
Preparing this meal initially seems a bit daunting for a beginner, but trust me, it is easier than you think. The key lies in the preparation of the chicken right. My mother always used to pound the breast of chicken until it was paper-thin. She did a nice job getting a little arm exercise while at it! We used to put the chicken between sheets of wax paper and patiently pound it out until it was even then sprinkle a lot of salt, lots of pepper, sometimes a pinch of MSG because that’s the way my Lola liked it.
Once the chicken is prepared, the more exciting part comes into view-inerting the cold butter (or cheese, if you’re preparing the variation). I wrap the butter properly so that when I fry, it does not ooze out. In my first try, I produced a saucy mess from butter, but with practice, I learned to roll the chicken very tightly and seal the edges with toothpicks to keep everything in place. My Lola would remind me, however, that the magic happens when the butter is perfectly intact and waiting to be released the moment you cut it.
The Allure of a Crispy Coating
If there is any one thing that all people agree on, it is the crust – golden brown and crunchy. Chicken gets a good coating in flour, followed by a dip in beaten eggs, and then a roll in breadcrumbs before frying. This must be done to achieve that perfect crispiness that can fulfill an individual’s aspiration for fried chickens. I also remember how once my sister suggested using panko breadcrumbs instead of regular ones, and the result was a lovely extra crunch on this very dish, making it even tastier. It’s all about experimenting and finding those little tweaks that will satisfy your unique sense of taste.
Dip the breaded chicken in fridge for about an hour to set. It was neat, as everything got left intact when hit by the hot oil. And then, when fried up, pure magic. The outside is all golden, and the inside is juicy, just waiting for butter or cheese to come through when sliced through.
A Bite of History of Chicken Ala Kiev
Although chicken ala kiev has long become everyone’s favorite dish in many a Filipino home, origins are older and more European. Chicken Ala Kiev is always associated with Russian cuisine but actually relates to French culinary tradition. The dish’s origin is accredited to some by a French chef serving the Russian nobility, while others assert that it entered the United States early in this century and rapidly spread. Wherever it came from, since then, the dish has since become something of the world’s, adored by many for its straightforwardly simple but sophisticated flavors.
Sometimes, this became special occasion food in the Philippines. My mom prepared it during birthdays or on Sunday family dinners especially if we had some more time to spent inside the kitchen. She would always remind us that it takes a bit of effort to put everything together, but the end was definitely worth it. And she was absolutely right-the first one bite into that tender, flavorful chicken and I was sold.
Make It Your Own Chicken Ala Kiev
This is the best thing about this dish; you can really make it your own and suit your taste. Some people add thyme or even parsley to their butter filling, while others just stick to the classic recipe. For a first timer, you can certainly use it to melt over cheese for its first use-it melts beautifully inside the chicken and makes a dish a little more forgiving if your butter doesn’t stay in place on your first try.
It’s the perfect dish to impress guests, yet simple enough for a cozy dinner at home. Whether trying to recreate something you have had in a restaurant or just want to bring a bit of indulgence into your everyday meals, this chicken dish is going to be a household favourite in mine, too.
For me, cooking has always been a family affair, and this recipe, with all its changes and memories, is definitely one of those dishes that keeps us within our beloved circle of life. So if you ever want to impress someone or just like to treat yourself to something special, remember that this mouthwatering recipe is just a few simple steps away.
How to Cook Chicken ala Kiev
Ingredients
- 4 pcs whole chicken breast
- 1/2 head garlic minced
- 1 Tbsp. fine salt
- 1/4 tsp. ground white pepper
- 1 tsp. MSG or granulated seasoning
- frozen butter or margarine
- 2 Tbsp. finely chopped parsley optional
- 1/2 cup bread crumbs
- 1 beaten egg
Instructions
How to Cook Chicken ala Kiev
- Remove skin of chicken breast. Separate meat from the bone. With one chicken breast you can make 2 pieces of "Ala Kiev".
- Place chicken breast fillet between 2 pieces of wax paper. Pound until the meat is spread thinly. You may use the flat side of knife in pounding.
- Rub the meat with minced garlic. Combine salt, MSG, and pepper. Sprinkle on the meat.
- Cut frozen butter into sticks, 3/4 inch thick by 2 1/2 inch length. Place 1 piece in the middle of the meat, sprinkle with parsley and roll like a drumstick.
- Be sure the butter is well enveloped in the meat or it will ooze out while frying. Secure with a toothpick.
- Cover thoroughly with flour, dip in beaten egg and roll on bread crumbs. Place in refrigerator for 1 hour to set the coating.
- Deep fry for 5 minutes, remove the toothpicks and serve immediately. You can also use quick melt cheese to stuff in your chicken ala kiev.
Video
Notes
Cooking Tips of Chicken Ala Kiev:
Keep the Butter Frozen
Before doing any stuffing, keep the butter frozen hard inside your chicken. This helps the butter not to melt too fast from the pan during cooking and come out of the chicken. The butter is easy to handle when rolling into the breast as well when it is frozen.Pound the Chicken Evenly
Pound the chicken out as thin as possible so it cooks uniformly. Some parts of the chicken will cook faster than others if there is any variation in the thickness and may dry out. The use of wax paper over the pounding surface prevents tearing, and the multiple turns smooth out the surface.Let the Coating Set
Once you have dipped the chicken in flour, egg, and then breadcrumbs, refrigerate at least an hour to let the coating set a little so that it stays on while frying; otherwise, you end up with a loose, soggy crust that will not crisp.
