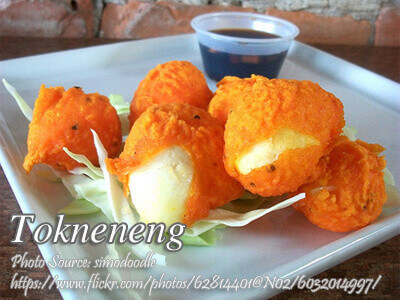
Tokneneng is one of the popular street foods made from chicken or duck eggs, coated with crispy orange colored batter. The smaller version is called kwek-kwek which are made from quail eggs. Although this is very popular, yet many are confused which one is tokneneng or kwek-kwek. I’m one of those confused people before but with a little research I found out that kwek-kwek is made from quail eggs while the tokneneng is the bigger brother made from chicken or duck eggs. If you will ask my opinion, I like the taste of battered fried eggs made from duck eggs than chicken eggs.
When preparing the batter, it is a little tricky because you might be tempted to add more water (because it will take some time for the water and flour to mix) and the result will be a very thin consistency which will not coat the eggs well. If the batter looks too dry at first, mix it very well and add water a teaspoon at a time until you achieve the correct consistency.
And about the dipping sauce, this is already tried and tested in the past when we are still selling those fried eggs in our food cart before. Actually this is also our home recipe dipping sauce for fried tokwa or tofu.
Tokneneng or Kwek-Kwek: A Crispy Street Food Favorite
If there’s one food that instantly transports me back to my childhood afternoons in Manila, it’s tokneneng. This battered and fried egg delicacy is a beloved street food that never fails to draw a crowd. But like many people, I used to confuse it with its smaller counterpart, kwek-kwek. It wasn’t until my cousin Kuya Ariel pointed out the difference during a trip to Quiapo that I realized kwek-kwek is made from quail eggs, while tokneneng uses larger chicken or duck eggs. That tidbit stuck with me, and now I can’t help but correct anyone who mixes them up!
This recipe for it is close to my heart, not only because it’s delicious but also because it reminds me of the times my family sold it at our small food cart. With its vibrant orange batter and crispy shell, it was always the bestseller.
The Secret to a Perfect Tokneneng Batter
Making the perfect batter for this fried egg is where the magic happens, but it can be a little tricky if you’re new to it. When I first tried making it on my own, I made the mistake of adding too much water to the flour mixture. Tita Baby, who used to sell tokneneng at the local palengke, gave me a tip: start with a thick batter and gradually thin it out, one teaspoon of water at a time, until you get the right consistency. It should be thick enough to stick to the eggs but not so heavy that it clumps.
The bright orange hue is another hallmark of tokneneng. Traditionally, food coloring is used to achieve this vibrant color. If you’re hesitant about using artificial coloring, you can opt for natural alternatives like annatto seeds soaked in water to extract their pigment. Not only is it a healthier choice, but it also adds a subtle, earthy flavor.
Why Coat the Eggs with Cornstarch?
Before dipping the boiled eggs into the batter, they’re coated with cornstarch. When I asked my Lola Inday why this step was necessary, she explained that it helps the batter cling better to the surface of the egg. Without it, the batter might slide off during frying, and no one wants a patchy tokneneng! This technique ensures every bite is perfectly crispy and satisfying.
And about boiling the eggs—don’t skip the little sprinkle of salt in the water. It may sound unnecessary, but it keeps the eggshells from cracking. Plus, cooling the boiled eggs in tap water afterward makes peeling a breeze. It’s one of those kitchen tricks passed down in our family that never fails.
Frying Tokneneng Like a Pro
Deep frying is the final step in making tokneneng, and it’s where you need to be extra careful. I still remember the first time I fried a batch; I overcrowded the pan, and the eggs stuck together. My Ate Josie laughed and said, “Isa-isa lang, para hindi mag-away sa kawali!” Since then, I’ve stuck to frying no more than three or four eggs at a time.
Keeping the oil temperature consistent is also important. If it’s too hot, the batter will burn before the egg heats through; too cool, and the batter will soak up too much oil, leaving it greasy. Aim for medium-high heat, and use a slotted spoon to drain excess oil after frying.
The Sauce: A Tangy, Spicy Pairing
The dipping sauce is what elevates tokneneng from good to great. Our family recipe combines vinegar, soy sauce, sugar, onions, water, and chili for a balanced flavor that’s tangy, salty, and just a little sweet. This same sauce was a hit back when we were selling it at the food cart. It’s so versatile we even use it for fried tofu (tokwa) at home!
If you’re a fan of spicy food, don’t be shy with the chili. Kuya Ariel swears by adding a generous amount of labuyo to the mix, claiming it’s the perfect match for the crispy, savory eggs. For a milder version, you can use banana ketchup as an alternative dipping sauce. It’s a sweeter pairing but just as satisfying.
A Little History of Tokneneng
Did you know that tokneneng and kwek-kwek are relatively modern street food creations? They gained popularity in the late 20th century, thanks to enterprising vendors looking for creative ways to serve affordable and filling snacks. The eye-catching orange color and crispy texture made them an instant hit, especially among students looking for a quick bite after school.
Today, you’ll find these fried battered eggs stalls all over the Philippines, often surrounded by groups of friends sharing stories over these tasty treats. For me, they’re more than just street food—they’re a connection to home and a reminder of the warmth of Filipino hospitality.
Why You’ll Love Making Tokneneng at Home
Making tokneneng from scratch may take a bit of effort, but it’s well worth it. Not only do you get to enjoy them fresh and hot, but you can also customize the batter and sauce to suit your taste. Whether you’re using chicken or duck eggs, this dish is bound to bring a little piece of the Philippines to your kitchen.
So the next time you’re craving a nostalgic Filipino snack, why not try making it? It’s crispy, flavorful, and perfect for sharing with family and friends—just the way street food should be.
How to Cook Tokneneng and Kwek-kwek
Ingredients
- 18 to 20 pcs chicken eggs or native duck itik eggs (for Tokneneng) or 3 dozen of quail eggs (for Kwek-kwek)
- 6 Tbsp. cornstarch
- cooking oil for deep frying
For the batter:
- 2 cups all-purpose flour
- 1 tsp. baking powder
- 2 1/4 cups water
- 1 tsp. salt
- 1 tsp. pepper
- orange food coloring
For the dipping sauce:
- 1/4 cup vinegar
- 1 cup water
- 1 Tbsp. soy sauce
- 2 Tbsp. brown sugar
- 1 pc red onion chopped finely
- 1 pc siling labuyo or chili pepper optional
Instructions
How to cook tokneneng or kwek kwek:
- Boil the eggs in water for 10 to 15 minutes and add a little salt. Don't cover the pot while cooking the eggs to avoid cracks on the shells. Drain the eggs and put tap water to cool.
- Peel the eggs and coat with cornstarch. Set aside.
- To make the batter; in a bowl, mix the flour, salt, pepper and water.
- Mix the batter using a fork or an electric hand mixer and mix until all the lumps disappear.
- While mixing, add a few drops of food coloring if you are using liquid coloring or if powdered, start with a small amount until the desired orange color is achieved.
- In a deep frying pan, heat enough oil to deep fry the eggs. Put the eggs in the batter and use a spoon to scoop the eggs from the batter then put it in hot oil one by one.
- Don't overcrowd the pan with eggs. 3 to 4 eggs per batch is enough to avoid the battered eggs from sticking with each other.
- Fry until the batter is crispy and remove from pan using a slotted spoon. Drain with paper towels or use a strainer to drain excess oil. Serve hot with dipping sauce.
- To make the dipping sauce; just combine vinegar, soy sauce, sugar, onions, water and chili. Mix very well until all the sugar is dissolved.
Video
Notes
Cooking Tips:
Achieve the Right Batter Consistency
When preparing the batter, resist the temptation to add too much water at once. Start with a thicker mixture and gradually add water, a teaspoon at a time, until it coats the eggs evenly without dripping excessively. This ensures a perfectly crispy shell that clings beautifully to each egg.Don’t Skip the Cornstarch Coating
Before dipping the eggs into the batter, roll them in cornstarch to create a dry surface. This step helps the batter adhere better, preventing it from slipping off during frying. The result is a seamless, crispy coating that holds up even after a dip in the sauce.Control the Frying Temperature
Maintain a medium-high heat when frying to achieve a golden, crispy exterior. If the oil is too hot, the batter will burn without cooking through; too cool, and the coating will turn soggy with excess oil. Fry in small batches to keep the temperature consistent and ensure perfectly cooked tokneneng every time.


This is not for the impatient cook. The batter is too thick, I had a hard time getting it to stick to the egg. Not only once when the egg totally got separated from the batter coating as I drop it in the oil, lol. The dip is so light, I had to spoon the egg with it……ahhhh, but the taste is totally divine. I so love it â¤ï¸ðŸ‘ðŸ‘
Hi Faith, as I’ve mentioned in my post that preparing the batter is a little tricky. The batter is supposed to be thick but if it is too thick, add a little water about 1 teaspoon at a time then mix again. The batter should stick to the eggs because you should coat it first with cornstarch. Did you coat it with cornstarch first before dipping the eggs in batter? Anyway I’m happy that you liked the tokneneng recipe! Cheers!
nice one